Showing posts with label Fabric Spray Paint. Show all posts

Saturday, February 23, 2013

DIY: Painters Tape Shirt


After SO LONG…. I'm finally back! Did you miss me? I'm not even are how it's already been so long since my last post… So I'm returning with a very simple and easy DIY…. The painters tape shirt…

Materials-
-Shirt… or any garment you wish to revamp
-Fabric Spray Point, or Fabric Dye in a spray bottle
-Painters Tape

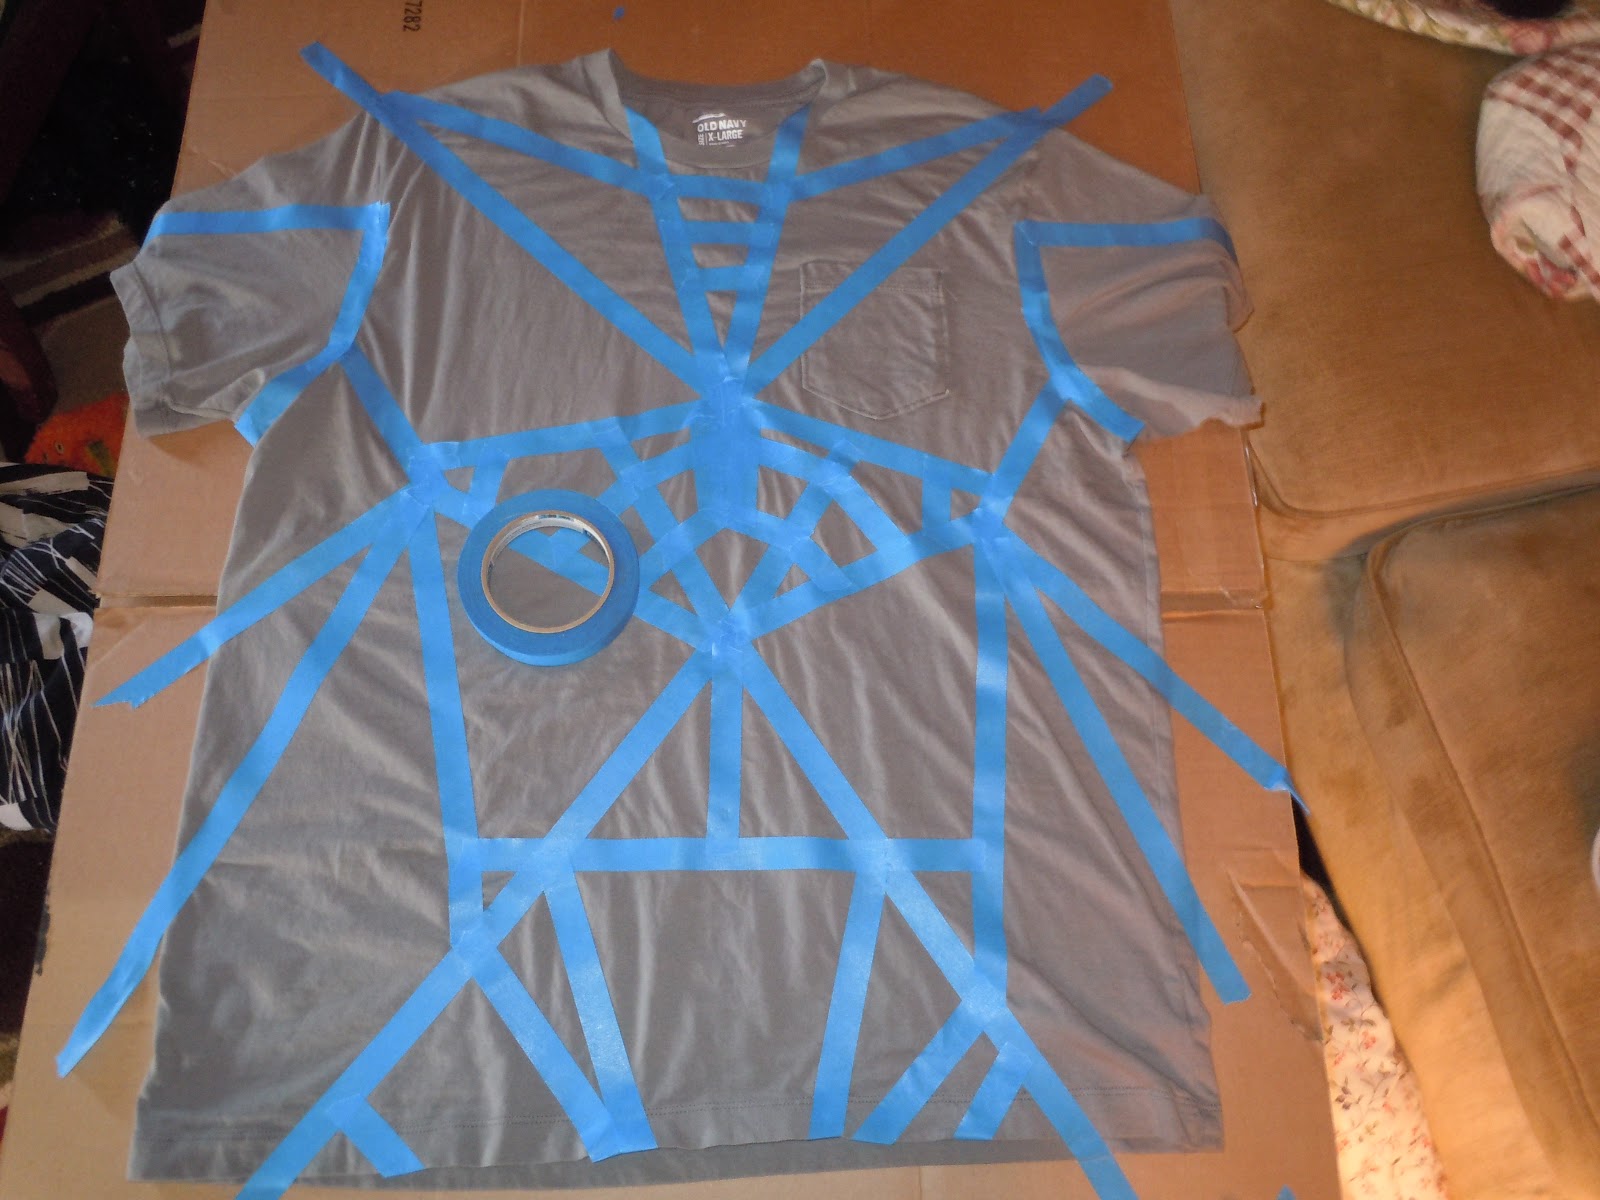

This is literally one of the easiest projects ever… LITERALLY! …..and the results are amazing. Simply lay out your garment on a piece of cardboard (you'll use the cardboard to spray on top of later) and begin taping away. I went with a (mostly) symmetrical design that kind of came out with a bondage-y feel. Tape both sides if you want a full design, connect the lines that end on the side and shoulder seams to make the design feel really complete. WARNING: Either use a good tape or really make sure it's all pressed down or you will have bleeding. I happened to like the effect.


Next… its exactly what you would expect….. spay time! Follow your fabric spray paint's (or dye in a spray bottle) directions for spraying your garment, and drying time. I used a mixture of two different fabric spray paints because one ran out mid spray. Of the two I have used I prefer Tulip brand's fabric spray paint over "Simply Spray". Though the "Simply Spray" has better packaging and nozzle it contains much less product that Tulip's spray. 


In conclusion I LOVE the way my shirt turned out, and it has truly lasted. It has gone through TONS of washes and wears and has not faded a bit. This shirt has literally become one of my most grabbed pieces in my wardrobe.


Honestly I could have taken a better picture of the finished product… so look forward to a post featuring some better shots of finessed products of this and previous DIY projects… Maybe even an OOTD…?

Now back to my Rhinestoned Dreams,
Zane Walker

(I also wanted to acknowledge that I have in no way been paid by the mentioned companies, the views and opinions are my own)


Saturday, September 8, 2012

ARCHIVE DIY: Alexander McQueen Inspired Shirt

This is the first "Archive" post, which simply means it is a post from the original (previous) website for Rhinestoned Dreams. Every now and then I will post one of these previously unreleased (to this website) DIY's… enjoy!


MATERIALS: 
-T-shirt of garment (color of you choice, I chose white!), 
-Fabric spray paint (I used Tulip brand but any should work), 
-Poster board/stencil sheet, tape (depending on poster board or not), 
-Foam board or cardboard, 
-Trash bags, and patience! 


The first thing you are going to want to do is sketch or draw out you design or idea. If you are making a shirt you can draw a simple t-shirt, and if you are making something like a dress or jacket simply draw out the basic shape and design of the garment! Design away! I made an Alexander McQueen inspired shirt for my trip to New York and the MET for the Alexander McQueen: Savage Beauty exhibit!


Once you have a clear idea of what you want to do it's time to start sketch the stencils. Unless you have pre-made stencil you purchased or already made your own! I made a full Union Jack that was really a full bleed application! On mine it goes from the collar to hem, all the way around the shirt, and the sleeves! This made my specific design and shirt rather expensive because I wanted it to also have full bold coverage! As long as your design isn't too intricate it shouldn't take you too long and it should stay inexpensive!

You want to sketch out your design on poster board or stencil sheet(s), if you don't mind occasional bleeding and messiness go for the poster board it gave mine a real DIY look! But if you want straight clean lines I would go for the stencil sheets because you can cut them into your own and most of them have adhesive backs! 


Now that you have your stencils drawn it's time to cut all of them out! For me it took awhile because I wanted things like fonts to come out the best they could! I used and suggest an x-acto blade for cutting out the pieces with a little help from scissors, and a ruler close-by for any straight edges!


It's time to prep your shirt, make sure you follow the directions for your specific brand of fabric spray paint! Insert a pieces or foam board or cardboard cut to fit your garment so the paint does not bleed through to the other side! I used an old sheet and a trash bag I cut open as a workspace on my carpet floor for protection from over-spray! Apply your stencils and spray! 


For the brand I used (Tulip) I allowed the layer to almost (if not all the way) completely dry before spraying another coat. It's easier to apply multiple light coats to achieve full coverage and boldness! Allow to completely dry before removing the stencil and applying the next (especially if the next stencil overlaps the area recently sprayed!). Spray your stencil pieces one by one!


TIPS!: 
1. I happened to mess up when spray part of the Union Jack on my shirt and had to spray ever the mistake with multiple coats of white in the correct area, then other colors etc. got sprayed over it…. everything sprayed on top of the white came off so I recommend being smart and thinking before placing stencils in the wrong area as well as not spraying over a heavy application of the white fabric spay paint! Other colors sprayed nicely over each other just not over the white in a thick application!

2. Really follow your manufacturers instructions on when and how to wash you don't want to destroy all the work and design you put into it!

3. Take your time and think out the design and make sure you have correct placement before spraying!

4. Be creative, make it your own! You were Born This Way!

5. Have an artistic friend come over to help with the stencils! Mine was able to help with pieces I couldn't get to look right! It may also help if they are an aspiring architect! lol


Now back to my Rhinestoned Dreams,
Zane Walker