Showing posts with label DIY. Show all posts

Wednesday, December 4, 2013

GIVENCHY Couture Inspired Cuffs DIY Tutorial

Inspired by Givenchy Couture and the use of various textures and embellishments all cloaked within a monotone masterpiece, I thought I would do a little recycling and make some bracelets!

Materials-
-Empty Tape Rolls
-A Scrap of faux leather
-Various faux pearls, rhinestones, studs, and any other kind of embellishment you can think of
-E-600 or Super Glue
-Clips
-Acrylic Paint (and a brush) or Spray Paint


Step 1-
Begin by protecting your surface, you could use a piece for scrap paper, an old table cloth, really anything to protect your table from glue and paint! Once your covered you want to cut your scrap leather to fit all the way around your tape roll as well as wide enough to be folded over the edges. I went for the edges folding over and meeting the middle but yours doesn't have to fold over that much. Grab your glue and smear some all over the outside of the tape roll. Carefully place your piece of leather and smooth it down. You can wait a minute and let this dry, but if you're anything like me you won't want to! Next lightly apply some glue to your edges that will fold inside of the roll. Fold the flaps over and smooth… this can take a minute and some coaxing! Put some clips all along the rim of the roll to hold the 'hem' in place while it dries. 


Step 2- 

Yet again you could wait and allow the glue to dry or just work around the clips! Begin glueing and glueing and GLUEING! Grab your faux pearls, rhinestones, sequins, studs, and just go crazy! Every and any kind of embellishments you have are welcome with open arms. I found it easiest to kind of stand the tape roll cuff on it's side and embellish in sections. With this you will have to let the glue dry for at least 10 minutes before you turn the cuff and lean it on the newly embellished parts. This is when making multiple cuffs at once comes in handy! 


Step 3-
Once your cuff is covered in everything but the kitchen sink LET IT DRY! I would give it at least an hour but I actually left mine to dry over night. Now it's time to paint! Yay! I chose to use acrylic paint for that matte kind of really coated finish but you could definitely just use spray paint! If using acrylic paint prepare to do multiple coats in order to achieve an opaque finish. The act of paint also helps seal in all of your embellishments and whatnots. I went for white but you can always use whatever color or colors you want! I think these would look absolutely amazing in black or red! If you want you can spray some acrylic sealant to help protect your new cuff!


Step 4- 
Once the paint is fully dry you're ready to wear! I actually made mine awhile ago and have worn them quite a few times, to be honest I have lost a few beads but I don't mind and kind of like the look... I noticed these were the beads where I used less glue so make sure to use enough glue! Any excess glue around your embellishments won't even be noticeable once painted anyway! 


Now back to my Rhinestoned Dreams,
xoxo
Zane Walker

Saturday, February 23, 2013

DIY: Painters Tape Shirt


After SO LONG…. I'm finally back! Did you miss me? I'm not even are how it's already been so long since my last post… So I'm returning with a very simple and easy DIY…. The painters tape shirt…

Materials-
-Shirt… or any garment you wish to revamp
-Fabric Spray Point, or Fabric Dye in a spray bottle
-Painters Tape


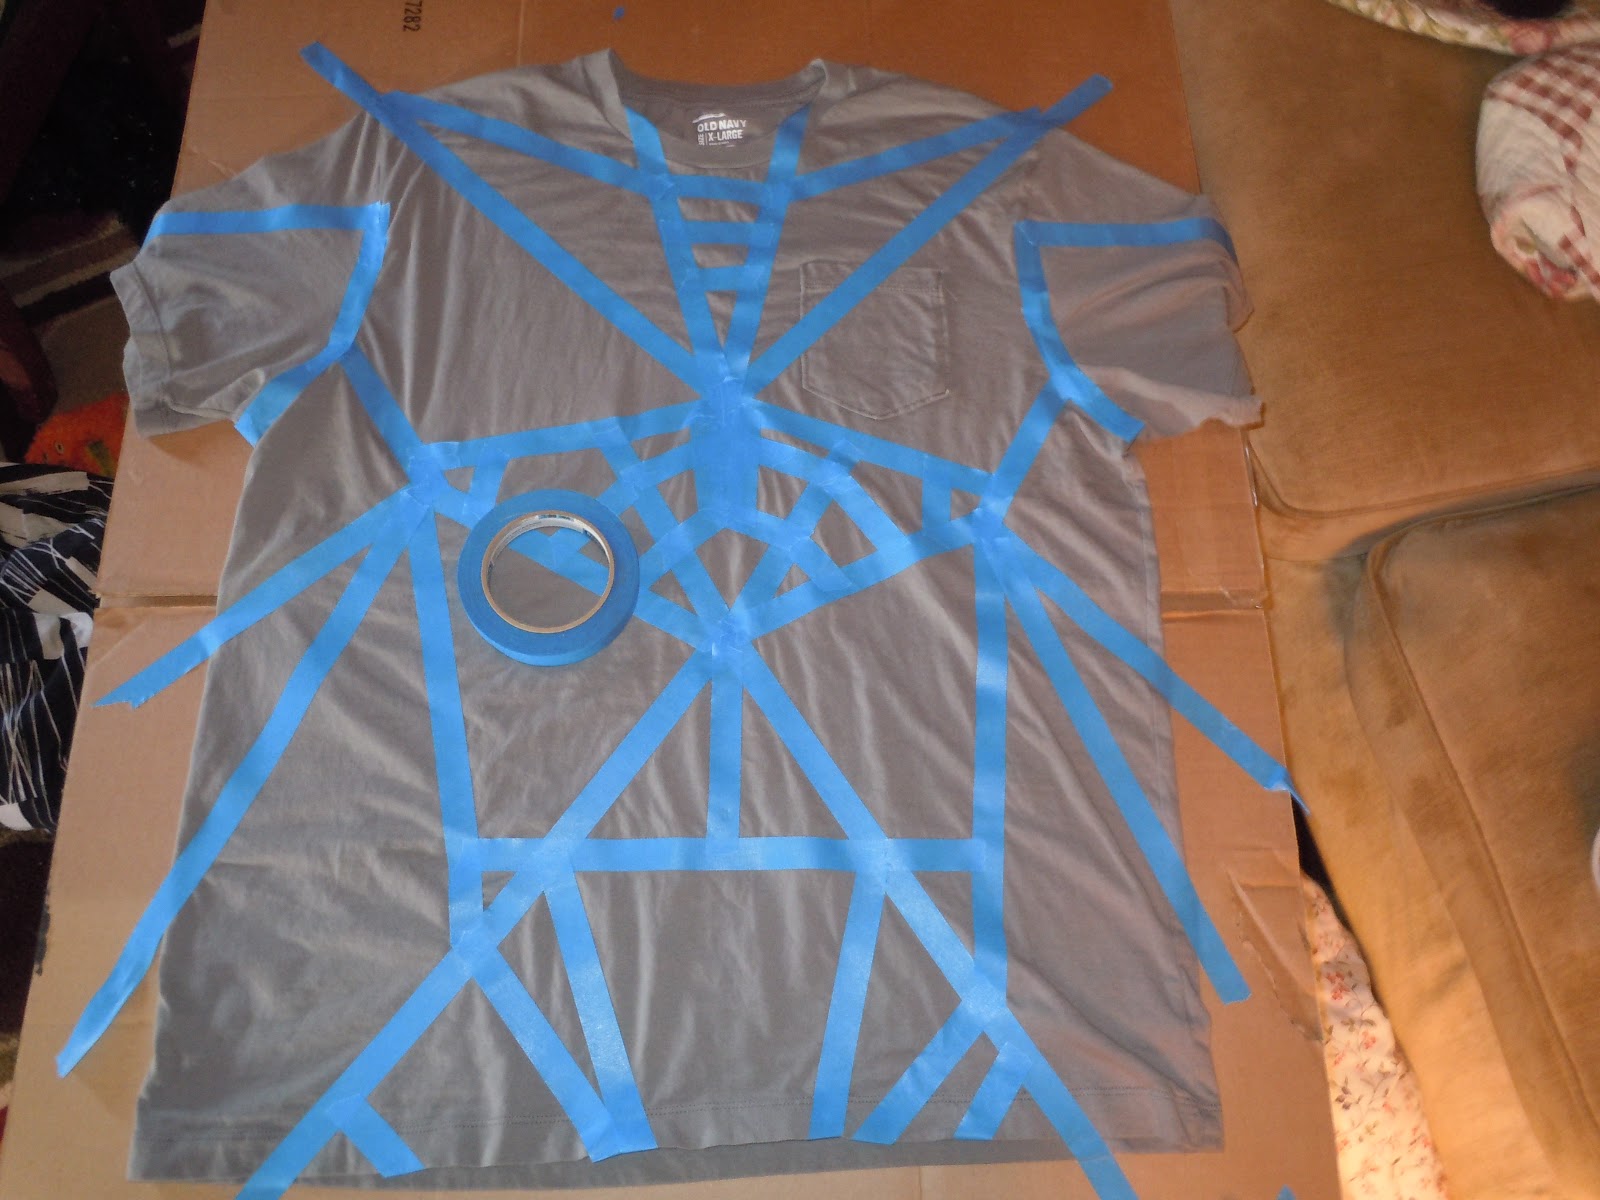
This is literally one of the easiest projects ever… LITERALLY! …..and the results are amazing. Simply lay out your garment on a piece of cardboard (you'll use the cardboard to spray on top of later) and begin taping away. I went with a (mostly) symmetrical design that kind of came out with a bondage-y feel. Tape both sides if you want a full design, connect the lines that end on the side and shoulder seams to make the design feel really complete. WARNING: Either use a good tape or really make sure it's all pressed down or you will have bleeding. I happened to like the effect.


Next… its exactly what you would expect….. spay time! Follow your fabric spray paint's (or dye in a spray bottle) directions for spraying your garment, and drying time. I used a mixture of two different fabric spray paints because one ran out mid spray. Of the two I have used I prefer Tulip brand's fabric spray paint over "Simply Spray". Though the "Simply Spray" has better packaging and nozzle it contains much less product that Tulip's spray. 


In conclusion I LOVE the way my shirt turned out, and it has truly lasted. It has gone through TONS of washes and wears and has not faded a bit. This shirt has literally become one of my most grabbed pieces in my wardrobe.


Honestly I could have taken a better picture of the finished product… so look forward to a post featuring some better shots of finessed products of this and previous DIY projects… Maybe even an OOTD…?

Now back to my Rhinestoned Dreams,
Zane Walker

(I also wanted to acknowledge that I have in no way been paid by the mentioned companies, the views and opinions are my own)


Wednesday, December 5, 2012

DIY: Meat Fabric!

Meat Tablecloth for the win?

Today's DIY project is obviously inspired by Lady Gaga and the iconic "Meat Dress". I am going to the Born This Way Ball Tour in February (DYING WITH EXCITEMENT!) so I have been randomly working on my outfit in preparation for the big day. Today I am going to share with you the technique I used to make my "Meat Fabric" which I made into a t-shirt. I'm also going to include some ideas for other methods that I think will work. You can also use this technique on ready-made shirts etc. or use the fabric to make your own fabric meat dress!

Materials-
-Red garment or fabric (I used a red jersey material)
-Bleach
-Old or very cheap paint brushes
-Spray bottle 
-A bucket of clean water for rinsing
-Long cleaning gloves 
-A tarp, old sheets, or old towels (something you won't mind also getting slightly bleached

I forgot to take a picture of my materials set up before I started….. as well as photograph during. Smart! I know, so sadly we're going to have to just go with an explanation… it's really simple and easy, trust me!

Before I even started using the bleach I put on my long yellow cleaning gloves, you don't really want to cover yourself in bleach! I began by laying out my surface for bleaching outside, it's always a good idea to do any bleaching projects outside as well as on top of a surface. I used a bunch of old and messed up beach towels so the bleach didn't get on the ground and harm any animals or anything. Then I laid down my pre-washed fabric on the "tarp". 

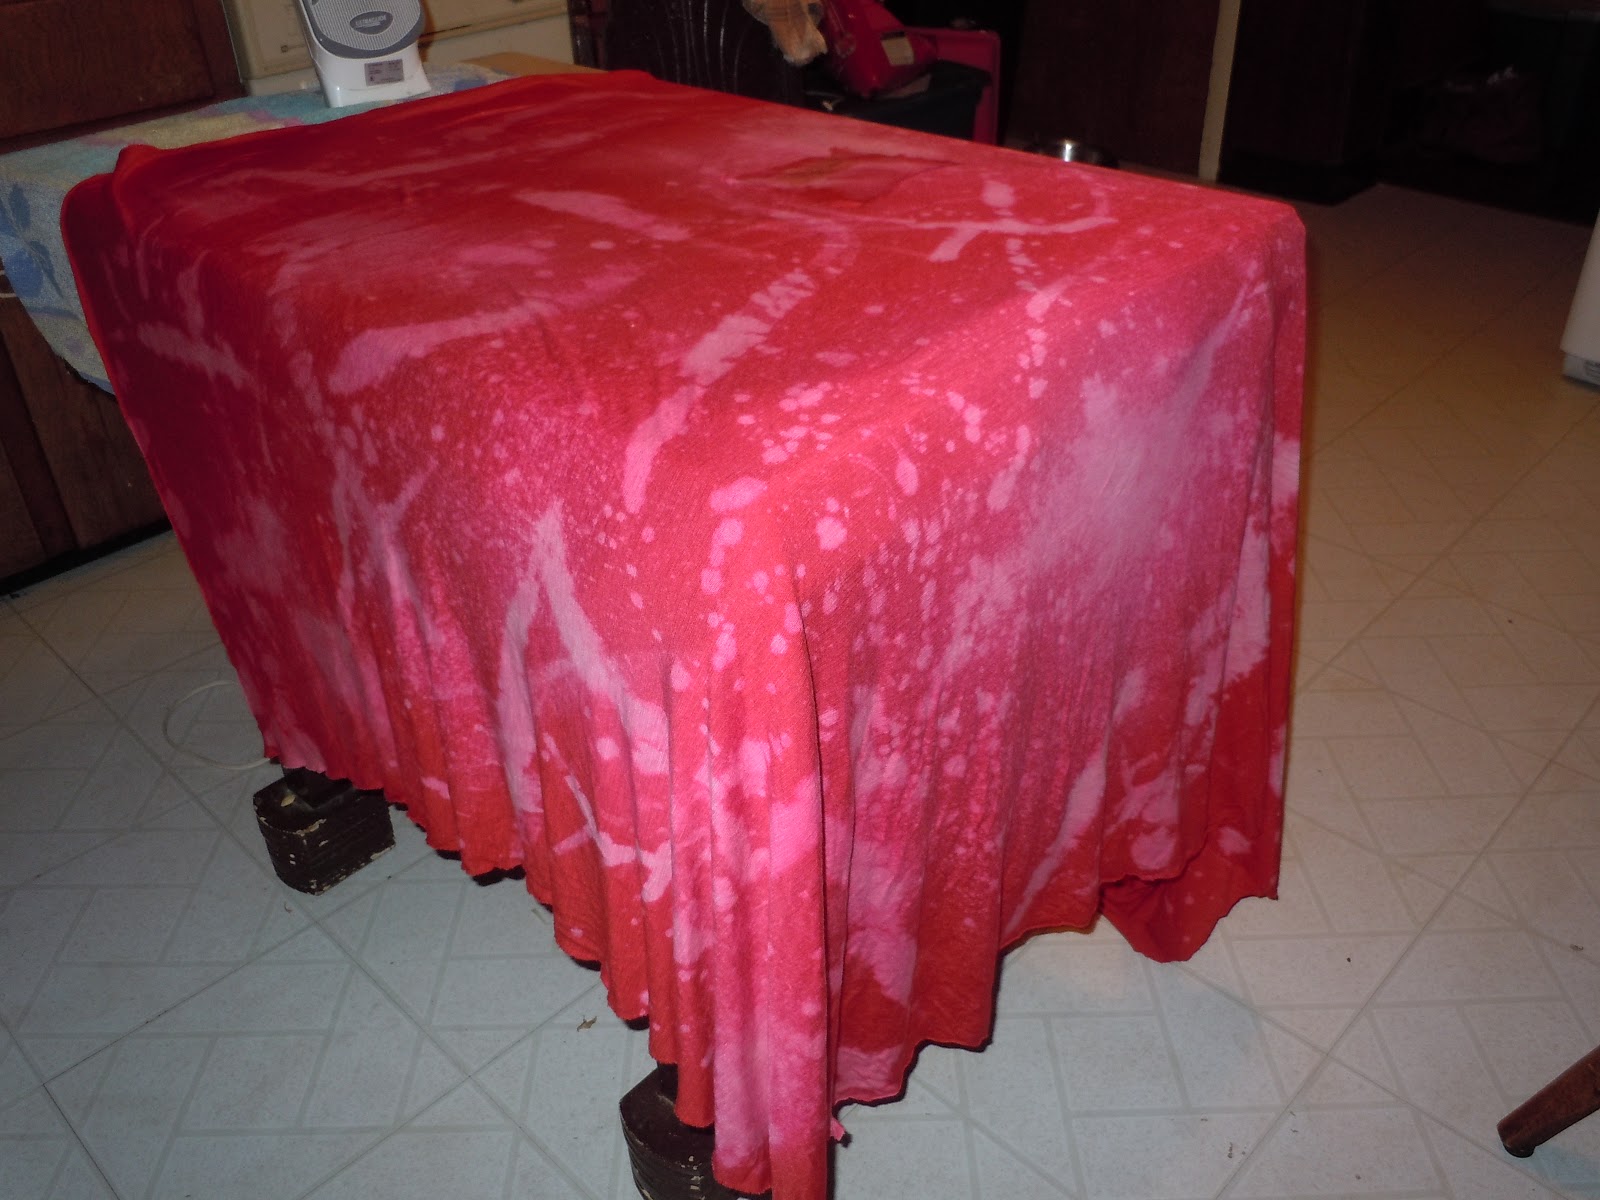
I had already poured some bleach into a spray bottle, as well as into a disposable container for use with brushes. Then randomly spraying, bunching up the fabric a little bit and spray again. Taking the old brushes and smearing the bleach on in tissue and fat-like ways to mimic meat. Then splattering some bleach in the most random places to hopefully achieve a meat-ish appearance. After awhile you have to take a leap of faith and walk away for a few minutes at a time to really let the bleach sit and kind of develop. It was colder the day I did mine so it took a bit longer, bleach seams to react faster in warmth. 

Once your "meat" reaches a state you are happy with grab your fabric and rinse it out in your bucket of clean water. Clean up your supplies and take it to the washing machine. Once dry you get to really see your outcome and final product (or in my case final product of the fabric… not what it has been made into).


I did remember to take one picture of the bleach process!
Meat Tablecloth anybody?
Tag I made for my "MEAT SHIRT"

You could also do the same thing I did with ready made garments, you could go to thrift stores and find red pieces you think would like to try and give it a whirl…. or you can possible try a tie dye method using white fabric or ready-made garment(s) and kind of do the same with spraying and whatnot. Another method I think would probably work is fabric paint, maybe thinning it out a little bit with water and painting the white-ish color tissues and fats onto red fabric? 

After seeing how the fabric came out you probably want to know how my actual "Meat Shirt" came out…… but I am going to save that for an OOTD for my date of the Born This Way Ball!

Now back to my Rhinestoned Dreams,
Zane Walker

Wednesday, November 28, 2012

ARCHIVE DIY: Fashion Inspired Ornaments!

….and Rhinestoned Dreams is back! With another "ARCHIVE DIY" project from the original website, as always the previous DIY posts from there will and are randomly re-posted to the updated version of Rhinestoned Dreams! Yay! Wooo! And applause! Yay! With the Winter Holidays coming I thought this would be the perfect time to post this "ARCHIVE DIY" or …. Fashion Inspired Ornaments! This is a super easy and fun project,  but it can be quite time consuming based on how many beads, rhinestones, and sequins you use!


Materials: 
-Polymer clay (Oven bake clay, Sculpey etc.)
-Paint (optional)
-Embellishments (sequins, beads, glitter, rhinestones, anything really!!) 
-Glue 
-Knife 
-Cutting surface


First think of what you want to make ornaments of. I sketched them down in the shape and size I wanted them to be, I then simply cut them out to use as a template. Now roll out your Sculpey or any oven bake clay. This can be a little difficult, I find rubbing my hands together to heat them up, then kneading the clay works best. Now roll out the clay to your desired thickness.

Lay the templates of your ornaments down on the clay. I chose to make fashion inspired ornaments. In the end I noticed I really only made shoes! With the knife carefully cut out the shape based on the template on your cutting surface. Once the ornaments are cut out you can punch a hole to hang or insert a loop. 


Bake them! Simply bake them, following your clay's directions until they are mostly hardened. Take them out of the oven, they will finish setting up once they are out of the heat. Allow them to cool.


Once they are cooled down we can embellish! You can paint them first, but I decided not to. I chose various beads, sequins, and rhinestones to complete the look I was going for. Embellishing time! Using any type of glue you see fit, I used a rhinestone/sequin glue, begin applying anything and everything. I made two Alexander McQueen Armadillo's, a Noritaka Tatehana Heeless Shoe, a McQ inspired head, and an ornament inspired by the fragrance "Angel" by Thierry Mugler. 


Allow them all to dry, once dry you can hang them and admire your work!

Now back to my Rhinestoned Dreams,
Zane Walker

Saturday, November 24, 2012

Random Fashion Inspirations.... thanks to the Internet!

Random AMAZING fashion inspirations found on the internet. Thought you might like to get inspired too....

Now back to my Rhinestoned Dreams,
Zane Walker

Saturday, October 6, 2012

ARCHIVE DIY: Symmetrical Print Shirt


This project is super easy, and it also happens to be SUPER cheap!

MATERIALS: 
-Shirt (color of your choice)
-Dimensional fabric paint (multiple colors of your choice)

Once you have your "dimensional fabric paint" which you can find just about anywhere it's time to find your shirt! I first started with an old black black t-shirt that I NEVER wear. I has the color scheme in mind so I go to making it!


I used fabric paint pens because that is what I found at my local Wal-Mart, so (for me at least) open up the package and pop the seals of the pens you are using right now. I chose blues, pinks, purples, and silver… I was going to use white but actually picked the silver accidentally… still looks great! 


Start to squirt blobs of paint in any type of design but stay on one side of the shirt leaving the other empty. Once you have the colors and designs (or blobs) on half of the shirt it is time to make it symmetrical! Fold the black empty side over onto the side with paint. Take your time, I went too fast and my shirt is a little crooked! Once it is folded in half press the sides together. Go around and press down anywhere you think there is paint… or just everywhere!


Now it is time for the great reveal! Unfold and carefully peel the two sides apart. You should have an amazing and unique symmetrical print on your shirt (or other garment that looks like no other!


I also picked up some "blank bandanas" while at Wal-Mart. They are basically hemmed 22'' squares that you can draw, paint, and embellish! I started to draw on one with fabric markers and fabric pens and haven't got around to finish it but the it already looks amazing worn! So I decided to try to make a symmetrical McQueen inspired print bandana following the same method! Sadly the paint was too thick for the thin bandana and when it dried it became hard to wear.


I also made an apron for my nephew! My mommom says it looks like a frog wearing a dress!

72 hours after applying the paint I washed the pieces following my fabric paint brand's directions, and after many, many, MANY washes later the print is still on and looking good! I hope you all enjoyed this "ARCHIVE DIY", and there will be a NEW DIY next Saturday!

Now back off to my Rhinstoned Dreams,
Zane Walker


Friday, September 28, 2012

ARCHIVE DIY: Galaxy Print Cardigan


Today's "ARCHIVE DIY" post is….

"Galaxy Print Cardigan/Garment of your choice!"

Materials: 
-Dark colored garment (grey cardigan in my case)
-Small bottles of fabric paint in your color choices
-Water
-Sponge paint brushes 
-Area to work on


Set up your workspace and (if you are working on some sort of top) place cardboard or foam board cut to fit between the layers to avoid the bleeding of paint. Start to mix your colors into nice blends varying from dark to light. While blending your colors cut in water to thin out the paint. Thinning out the paint allows you to use less at a time and give you better layering to create "gases" and "cosmos".


Start painting! I ripped the foam piece off of a foam paint brush, this gives you more power over the application. Starting with the dark variation of your first color paint it onto the garment kind of patchy and messy. Now go into the next variation of the color, a little lighter. Do the same over the dark spot just painted but apply it so you can still see through to the darker parts. Do this with your varying lighter shades until you have create this pieces of your galaxy garment.


Once you have done this in the areas wanted using varying colors and shades it's time for the stars. I used both a pencil and a plastic bristle paint brush to make the stars. You can use white and yellow straight from the bottle or cut with water, depending on your preferences. At first I dabbed the pencil in white and made dots throughout the designs, but I found it took too long and looked a bit artificial. So I dabbed my plastic bristle paint brush in the white and kind of flung it over and at the garment. This gives it a randomized dot and splatter that looks like natural stars. You can repeat this with a yellow or gold color for varying stars.


Once you are done painting allow to dry. Following your fabric paint brands instruction for washing. I used Tulip which states wait 72 hours before washing inside out. I did so and all of the paint stayed put and the final product looks amazing, if I say so myself! 


I hope this helps you make your own Galaxy Print Garment, I am going to make a galaxy print bandana (using blank bandanas), and maybe a pair of old shoes! I bought the smallest bottles of fabric paint they had at the store and still used less than half to make a full-bleed galaxy print cardigan!

I also made a mini tote bag for my nephew!

Now back off to my Rhinestoned Dreams,
Zane Walker